I got this request from Rudolf:
Hi Alexander,
Do you have any idea to solve the following problem I have?
We would like to upload formatted text or binary data from a file as an attachment to with an on the fly create form to enter the comment.
I read your blog to spjs-upload-for-sharepoint-custom-upload-page- ….We would like to send this the comment and the attachments via a WebService to a SharePoint list to create a list item with attachments loaded.
Best Regards
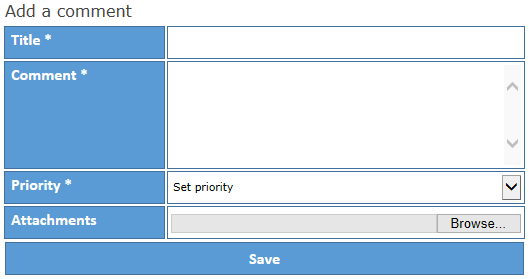
I have created this solution that lets you add a list item with one or more attachments from a custom form that you can place anywhere in your SharePoint site.
You may also be interested in this solution SPJS Upload for SharePoint: Custom upload page for uploading documents to various document libraries in a site collection.
* This solution requires you to be logged in with a user with the necessary privileges to add a list item.
* This solution requires IE 10 or above. This may be a problem for users with SharePoint 2007 or 2010 as this versions forces IE 8 mode for newer versions of IE. Change the document mode or use Chrome or Firefox.
- Download jQuery from here. Please note that you should use v1.x as v2.x does NOT support IE versions below 9.
- Download spjs_utility.js from here
- Download the files “spjs_addItemWithAtt.css”, “spjs_addItemWithAtt.js” and “spjs_addItemWithAtt_CEWP.aspx” from here.
- Upload all the files but “spjs_addItemWithAtt_CEWP.aspx” to a document library in the site collection, or a folder created using SharePoint Designer on the root of the site collection.
- Update the file “spjs_addItemWithAtt_CEWP.aspx” with the path to the files you have uploaded, and fill in the argument object as described below. Then upload it to the same location and refer the file using the “Content link” option in the CEWP. You can also use the code directly in a HTML for Web Part in the page where you want the form to appear. DO NOT ADD THE CODE DIRECTLY IN THE CEWP AS HTML.
You call the function from the CEWP or the HTML Form Web Part using code like this:
spjs.addItemWithAttachment.init({
	"instanceID":"1",
	"listName":"{1a2bb561-c557-4a28-938f-0fb600b136d7}",
	"listBaseUrl":"",
	"header":"Add a comment",
	"text":{
		"saveBtn":"Save",
		"successMsg":"Saved successfully",
		"browserNotSupported":"Your browser is not supported."
	},
	"fields":
		[
			{
				"fin":"Title",
				"label":"Title",
				"type":"text",
				"required":true
			},
			{
				"fin":"Comment",
				"label":"Comment",
				"type":"note",
				"height":"100px",
				"required":true
			},
			{
				"fin":"Priority",
				"label":"Priority",
				"type":"choice",
				"required":true,
				"emptyLabel":"Set priority",
				"choices":[
					{"v":"0","f":"Priority = low"},
					{"v":"1","f":"Priority = med"},
					{"v":"2","f":"Priority = high"}
				]
			}
		],
	"attachements":true,
	"attLabel":"Attachments",
	"multiple":true
});
An uniquer id for this instance. If you add more than one form the same page you must change this so that each instance is unique. In the CEWP code you find this div:
<div id="spjs_addItemWithAttachment_instanceID_1"></div>
This corresponds with the instanceID to form an unique placeholder where the custom form will be inserted.
The list GUID or display name of the list to add the list item to.
The baseUrl of the site where the list is located. Use “” for the root site, or “/Sites/MySite” for a site named “MySite” on a managed path. This is NOT the URL of the list.
This is the text that goes above the form.
Various text used in the solution.
Array of objects in this format:
{
"fin":"Title",
"label":"Title",
"type":"text",
"required":true
}
“fin”: The FieldIntenalName of the field in the list you are adding the items to.
“label”: The form label in the custom form you are creating.
“type”: Type of field. Supported types are “text”, “note” and “choice”.
“required”: true or false to control whether the field must be filled or not.
“height”: Sets the height of the textarea in pixels.
“emptyLabel”: Sets the default value in the dropdown select.
“choices”: Object format like this:
"choices":[
{"v":"0","f":"Priority = low"},
{"v":"1","f":"Priority = med"},
{"v":"2","f":"Priority = high"}
]
“v” is the value to store in the list and “f” is the displayed value in the dropdown select. These two can be the same.
true or false to allow or disallow attachments.
The form label for the attachments.
true or false to allow for selecting multiple files.
To have multiple forms in the same page, repeat the call to “spjs.addItemWithAttachment.init” and change the “instanceID”.
Let me know if you find any bugs, or you have any comments.
Please note:
If you are a consultant and use this solution, I would appreciate it if you gave me a piece of the cake by using the “beer button” in the top right corner of this page.
Alexander