August 13. 2013
Second attempt with v3.02: fixes a bug preventing the user from saving the first time the configuration is added.
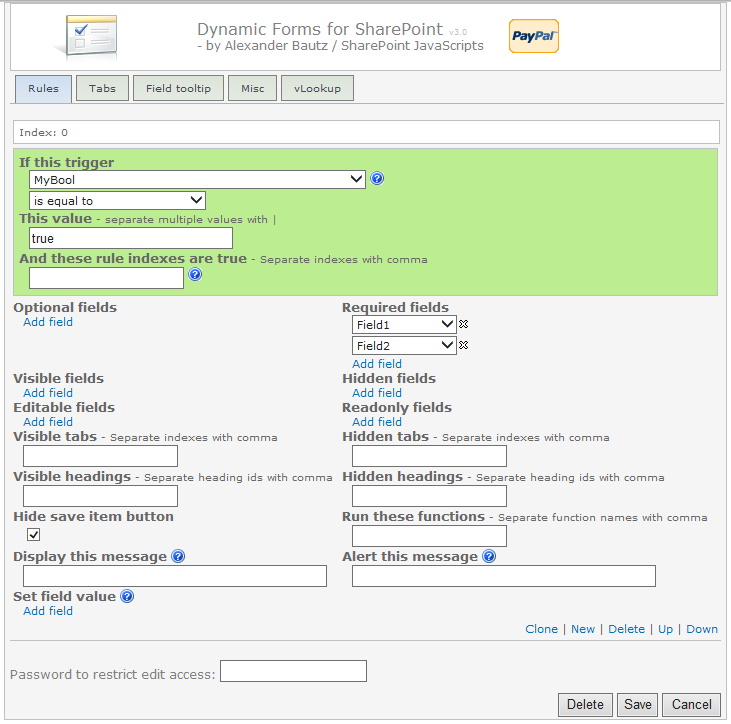
This is a solution for creating dynamic forms from out of the box SharePoint forms (preferably without content types). You can create rules that control whether fields are required or optional, visible or hidden, editable or read-only. You can also create tabs that you can target specific SharePoint users or groups, and you can add headings and rich tooltips for fields in the form.
You can link directly to a specific tab using this URL format:
…/NewForm.aspx?sTab=2
…/DispForm.aspx?ID=[an existing id from your list]&sTab=2
…/EditForm.aspx?ID=[an existing id from your list]&sTab=2
Images from the GUI:


Dynamic Forms for SharePoint
Dynamic Forms for SharePoint: Production
Dynamic Forms for SharePoint – Now with Tabs
Dynamic Forms for SharePoint: Now with support for SharePoint 2013
Dynamic Forms for SharePoint: Now with side-by-side
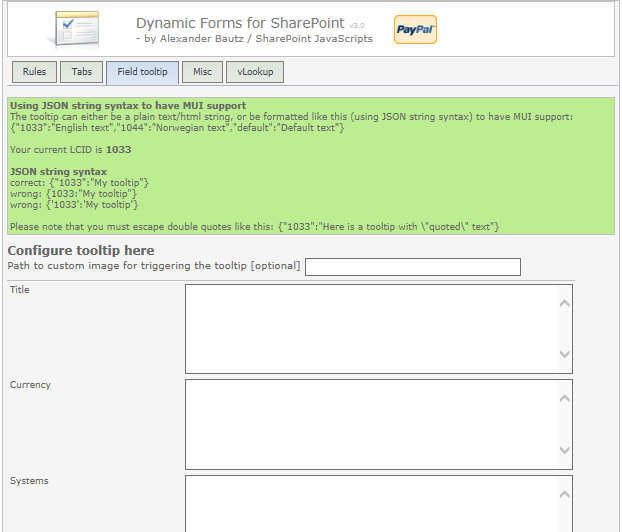
Dynamic Forms for SharePoint: Now with field tooltip
I have done a major overhaul of the code, fixed some bugs and added new features:
- Radio buttons can now be arranged vertical.
- When arranging multichoice or radio buttons vertical, the “fill in” will line up correctly.
- Fixed width of select when using “Arrange multi lookup columns vertical” in SP 2007.
- Custom CSS and JS: Small fix to try to avoid occasional errors.
- Export and import of settings are now in place.
- A copy of the last good configuration is automatically kept, and can be restored by a click of a button if you “break” it.
- Backwards compatibility is now better. Please note that downgrading to an older version will require you to restore a backup of the original setup.
- Changed the rule builder and added more fine grain controls of:
- Optional fields and required fields
- Visible fields and hidden fields
- Editable fields and read-only fields
- Visible tabs and hidden tabs
- Visible headings and hidden headings
- “Display this message” and “Alert this message” is now present in DispForm.
- You can now control who sees the enter setup button.
- You can now control who sees the orphan fields tab.
- You can now distribute tabs over multiple lines and not only 2 as before.
Step one
Download the latest version of the DFFS solution files from here. This includes the *.js file, *.css file and the gradient.zip. This last one should be unzipped before uploading to the file location (see below).
Step two
Download the latest version of spjs-utility.js from here.
Step three
Download v1.10.x or BELOW of jQuery here. Please note that version 2.x of jQuery does NOT support Internet Explorer 8 or below.
Step four
Put all these files in a standard document library or a folder created using SharePoint designer. Ensure all users have read access to the file location. Do NOT refer these files from spjsfiles.com as this server is not rigged to serve these files “live”.
Step five
Download the files “CEWP_example.txt” and “CEWP_Overlay_Example.txt” from here. Edit the script links (src) in “CEWP_example.txt” to point to the files stored locally. I repeat that you should NOT refer these files from spjsfiles.com.
Add the code to NewForm, DispForm and EditForm of the lists where you want this solution activated. The “CEWP_Overlay_Example.txt” must be placed ABOVE the form web part, and the “CEWP_example.txt” code must be placed BELOW the form web part.
How to add a webpart to the form page
SharePoint 2007
Go to NewForm, DispForm and EditForm and insert toolpaneview=2 behind the URL in this format:
…/NewForm.aspx?toolpaneview=2
…/DispForm.aspx?ID=[an existing id from your list]&toolpaneview=2
…/EditForm.aspx?ID=[an existing id from your list]&toolpaneview=2
Press Enter and you should be able to add a CEWP to the page. Repeat for all three forms.
SharePoint 2010 / 2013
In the list view, click “List” on the List Tools menu. Then select “Form Web Parts” and pick NewForm, DispForm or Editform from there and add a CEWP to the page. Repeat for all three forms.
I recommend using the Content link option in the CEWP to refer the code. The CEWP code should be put in a text file (txt) or an aspx file and put in the same location as the other files.
If you plan to put the code directly into the CEWP, you should choose the HTML Form Web Part in stead.
Step six
Go to the list and click “Add new item”. Click the little dot in the bottom left corner of the form to enter setup. When entering setup for the first time, the script will create a list to store the configuration. For help in the GUI, hover over the question marks.
You will have to upgrade both the *.js, the *.css file and spjs-utility.js.
As this is a major overhaul of the code, you might have to do some reconfiguring of the rules. In general, all settings are kept, but you now have more fine-grain control of the various settings so some rules might have to be changed.
Make a backup
When entering the setup after loading the new version, go to the “Misc” tab and export the settings by copying the text to a file. This is your backup in case something goes wrong and you have to downgrade to an earlier version. If you must do this, use the backup file and restore it by pasting the text in the text area under “Import settings”. When you have done this, you can load the older version of the script.
Some of you have already supported this blog by buying me a few beers – thank you for that!
For me to keep developing and supporting all these solution for free, a few more beers now and then would boost my motivation! – you find the “beer-button” in the top right corner of this page.
Use the comment section below let me know if you find find a bug, or you have a question.
Alexander